29.4.11

Grilled Cheese-Giving Feast

Yes, that's Mac and Cheese sandwiched in the middle.
Man, Grilled Cheese Month. You sped by faster than that dang bus Keanu and Sandra were trapped on fifteen years ago. But boy, did you live up to your name last week at LA’s Grilled Cheese Invitational. I expected a healthy amount of glorious cheese combinations, but GCI and its innovative food truck vendors offered more deliciousness than I could have dreamed for the appropriately bright, sun-filled day. I knew the food fest would be beyond satisfying as soon as I breathed in butter and cheese swirls in the air. Then I scanned the vendors’ menu. My mind boggled, my eyes bulged, and my tummy rumbled louder than a hungry pooh bear.
A mini convertible VW van! Tillamook provided delicious Grilled Cheddar and Pepper Jack Cheese Samples
What started out as a mere grilled cheese contest party among friends, grew into a behemoth cheese event now known as the Grilled Cheese Invitational. Since it was my first time attending, I was clueless as  what to expect; except, of course, bread, cheese, and butter. An event dedicated to just those three ingredients had to be worthwhile.
This is how you start a party. Sometimes I wonder what it'd be like to be a Stilt-woman for a living
Best marching band costumes ever haha
Worthwhile was indeed an understatement. This year’s GCI was like combining the concepts of a Bobby Flay “Throwdown” with a wine and cheese party, but multiplying it by eleven-teen, throwing in some quality beer, an array of food/beverage samples, an actual cheese mascot, and an eccentric marching band that replaced color guards with eclectic folks on stilts. The day was gloriously cheesy, literally and figuratively. And boy did I encounter a multitude of creations I'm willing to attempt in the kitchen. 
From LA's most famous food truck: Grilled Cheese Truck's Signature, The Fully Loaded
Cheesy Mac + Smoked BBQ Pork + Carmelized Onions
Many have seen this gluttonous sandwich featured on Food Network. Exactly what it's name says, the Fully Loaded nearly filled me up in three quick bites that I had to take it home. The southern inspired meal-in-a-sandwich definitely lived up to the hype. I'm glad we tried this one within a few minutes of crossing the cheese gates, because the lines for all three of their locations looked like a mile long by the time 1pm rolled around. 

Cynthia Washburn definitely had the most tantalizing and tastiest sounding menu. We wanted to try everything listed, mostly the Bacon Mexican Chocolate Brownies, but by the time we reached the front of the line, the brownies and blondies were gone. We were given some crumbs, though.
MY FAVORITE concoction of the day: Cynthia Washburn's Risotto Melta
Buffalo Mozarella + Fontina + Grana Padana + Lemon Capered Pesto Risotto
Inside this deep fried sphere was a lemon infused risotto that I couldn't get enough off. The herbed, deep fried crust complimented the creamy, gooey risotto; and the combination of cheeses danced happily in my mouth. I never tried Grana Padana, but now I'm inclined to search around the markets so I can taste it on its own.
Cynthia Washburn's Croque Senor
Jamon Serrano + Manchego + Membrillo & Sage; Battered and Fried
Another Washburn creation, the fried portion of the sandwich reminded me more of French toast. When I read "battered and deep fried," I assumed something along the lines of a Monte Cristo. But this classically French sandwich, with a Spanish spin was still delightful, with the Manchego and Membrillo (a quince paste from Spain) setting it apart from the norm.
The Daily Dose's Elvis
Mascarpone Cheese + Nutella + Caramelized Honey + Vietnamese Cinnamon
+ Candied Bananas + Maple Cured Bacon on Pan de Mie
Congratulations Daily Dose, you made, hands down, the best dessert sandwich at the GCI. A teaspoon or so of peanut butter added in and this sandwich would be a perfect, Shortcake dessert. Wordy descriptions would be superfluous. Just feast your eyes on the sweetness, and you're set.
Inside the best way to end the cheese-infested day
I'm happy to say I was not cheesed out by the end of the samplings and feasting. The increased sodium and sugar spike in my body is probably what made my brain crave cheese even more. Luckily, my tummy knows when enoughs enough. Even though I probably ate double than normal, the scrumptious-ness of all the cheesy delicacies elicited far more satisfaction than regret. Until next year, GCI. In the meantime, I'm going to attempt some of the dishes I missed out on...
- Shortcake

25.4.11

Little Lamb, Who Ate Thee?

"The Lamb"

Little Lamb, who made thee?
Dost thou know who made thee?
Gave thee life, & bid thee feed
By the stream & o'er the mead;
Gave thee clothing of delight;
Softest clothing, wooly, bright;
Gave thee such a tender voice,
Making all the vales rejoice?
Little Lamb, who made thee?
Dost thou know who made thee?

Little Lamb, I'll tell thee,
Little Lamb, I'll tell thee:
He is called by thy name,
For he calls himself a Lamb.
He is meek, & he is mild;
He became a little child.
I a child, & thou a lamb,
We are called by his name.
Little Lamb, God bless thee!
-William Blake, 1789


I can understand how some people get uneasy at the thought of eating lamb. To them, the word lamb is better associated with this:
Aww, I used to watch this show every day when I was seven years old!
How can anyone eat a lovely and fluffy thing like that? It's inhuman! It's unnatural!  And it was delicious! Especially for a first-time lamb roaster.


I originally wasn't going to write about lamb. I had been planning on writing about the Frrrozen Hot Chocolate from Serendipity (the restaurant and the John Cusack/Kate Beckinsale movie). But Sandwich already talked about ice cream in his delicious Breakfast for Dessert post last week. This left me with a predicament, as I had no other immediate back-up ideas for what to write.  


Then, in a great moment of serendipity, a trip to Wegman's for some Easter food shopping led to the lamb! Dad needed to buy some beef for his Mechado (yum!) and whilst looking through the refrigerated meats, we came across the lamb section. I had always wanted to make a lamb, and the sizes they had, approximately 4.5 lbs each, were a good size for our Easter party, as not all the relatives would want to have lamb. So, despite its hefty price ($7.50/lb), we picked up a leg of boneless lamb.  


This was actually my first time cooking lamb. We never cooked it in our kitchen before, mainly because it takes so long and often costs a lot. I didn't want to go overboard, so a simple search of "roast lamb" led to some great recipes. Rather than try one specific recipe, I just took the ideas I liked and made my own. There's no measurements here, as I pretty much played it by ear and scent, using as much or as little as I wanted of the following ingredients.
Not pictured: Salt, Pepper, EVOO, my drooling mouth
1 (4.5 pound) leg of lamb
3 garlic cloves, cut into slivers
Chopped Rosemary
Chopped Mint
Chopped Dill Weed
Salt & Pepper
Extra Virgin Olive Oil
I first chopped up the rosemary, mint, and dill weed, and mixed all three together in a bowl. The aroma of all three coming together was heavenly, particularly the strong mint. I had bought all three fresh on Easter, literally minutes before I started bringing everything together to prepare the lamb. Ironically, we actually have fresh rosemary growing in a potted plant; but by the time Mom told me about it, I had already chopped and mixed my three greens. 


 I knew that as a dry rub, the three wouldn't work well. So I added in a spoonful or two of extra virgin olive oil, stirring and mixing it almost like a paste. Food Network's Rachel Ray, or Giada DeLaurentiis, taught me the value of a paste for a rub, and I'm inclined to say it was Giada.
Chopped rosemary, mint, and dill weed, before the EVOO is added.
Before I could do the rub, I needed to insert the garlic. One recipe recommended inserting the garlic and doing the rub, then let it sit overnight.  I opted not to do that, preferring to do all my preparation together in one sitting, especially since it's my first time. Maybe the second time.  To insert the garlic, simply take a knife and puncture the lamb in strategic places, large enough for the garlic slivers to fit inside.  These will go all around the lamb; I ended up chopping the three cloves into twelve slivers.


Once the garlic's inserted, it's time to get your hands dirty.  I first tried using a spoon to spread the rosemary-mint-dill rub, but it simply wasn't spreading as nice as I wanted it too.  It clumped too much and generally looked abysmal.  So I simply used my hands, working the rub into the meat all over, almost like a massage.  It still didn't cover the lamb the way I had hoped, but for a first-timer, I think I did all right.
A rubbed lamb.  Note a couple of the garlic slivers sticking out, I didn't want to insert them all the way in for the picture.
During all this preparation, I was pre-heating my top roaster at 450 degrees (F).  Before I put the lamb in, I salted and peppered the whole thing; although, I didn't use much pepper, as I wanted the rosemary and mint taste to stand out.  In addition, I added a few sprigs of the fresh rosemary that we had (the one we grew), placing one or two on top of the lamb and a couple just on the rack.  


The lamb went into the roaster for 20 minutes at 450 degrees Fahrenheit.  I then turned the temperature down to 350 degrees, and the long waiting period began.  The common element of all the roasted lamb recipes I found said that it should cook for 30 minutes per pound, or until it reached an internal temperature in the 145-155 range.  With a 4.5 pound lamb, that meant two hours and some change.  During this time, we were making other food and family had arrived, and so the time actually flew by.


By the time the  timer rang, the lamb looked done.  I checked the internal temperature with a meat thermometer, and it reached 153F.  I immediately took the lamb out, set it on a plate, and took a picture.  Then I covered it in tin foil to let it cool down for ten minutes, whilst also letting its steam heat it some more.  
Finally, the moment of truth.  Cutting the lamb.  I'll just let these pictures speak their two-thousand words.


- Sonic

24.4.11

Happy Easter!

Thanks to Mom, Sonic and Shortcake were often voted
"Best Dressed"at holiday functions.
 We don't know what happened to Sandwich in this photo.
Knowing him, he may have been frozen in place somewhere
because Mom told him to not move.
Enjoy the Springtime feasts and celebrations! 

23.4.11

Arroz Caldo

Arroz Caldo with salmon and garnished with chopped spinach
During this week's slightly chilly evenings, I've yearned for comforting, warm soup, even though it’s not below 50F outside. Arroz Caldo, a type of congee or lugaw, ranks as my favorite. The fresh, ginger-enhanced rice porridge reminds me of my childhood, when our dad would make the dish in the midst of a light snowfall or during an evening thunderstorm. I remember dropping my crayons or my dolls whenever my nose picked up the fragrant ginger wafting through the halls, and running down to the kitchen to affirm that our dad was cooking mine and his favorite soup.

The congee, white rice cooked in a lot of water, is made with chicken and flavored with ginger, onion, garlic, and Patis. The ginger provides a fresh, peppery, sweet, pungent taste not often encountered in my current everyday cuisine. The semi-health-nut that I am, the version of Arroz Caldo I created yesterday is slightly different from Dad’s, but the generous amount of ginger and the soft texture of the rice still evoked childhood memories and provided the warmth I was yearning for all week.

Brown Rice Arroz Caldo with Salmon
Serves 4
  • 1 – 2 Tb oil for sautéing
  • 1 small – medium onion, chopped
  • 3 cloves garlic, minced
  • 1 fraction fresh ginger, peeled and julienned
  • 2 Tb Patis (fish sauce)
  • 1 cup brown rice (can use white rice or glutinous sweet rice)
  • 5 ½ cups low sodium chicken broth (use 5 ¼ for white or sweet rice)
  • 3 oz cooked wild salmon, shredded* (I used canned wild salmon to save cooking time)
  • Ground black pepper, to taste 
Optional Toppings: chopped green onion, sliced lemon, sliced boiled eggs, more patis

  1. In a large pot, over medium heat, heat the oil. Sauté the onion, garlic, and ginger for about five minutes, the mixture will be pretty fragrant. Stir in the fish sauce*.
  2. Add the water and rice. Bring it all to a boil. Cover and cook for about 40 minutes**, stirring every so often so the rice doesn’t stick to the sides or bottom.
  3. Add the salmon and pepper; cook for another 5 - 10 minutes.
  4. The dish will be ready and cooked once the brown rice has formed a risotto or porridge like texture. Stir in some more broth if the consistency is too chunky.
  5. Serve with desired toppings.
*If you would like to use chicken, you can add up to 1/2 pound of skinned, cubed chicken to the pot with the fish sauce. Add the water and rice once the outside of the chicken pieces are cooked to a golden brown color
**Cooking time will be shorter with white (around 20 minutes) or sweet rice (around 10 minutes). Keep an eye for the consistency
- Shortcake

20.4.11

Breakfast for Dessert

Prior to working in the restaurant kitchen at school, I had my two hot foods culinary courses with Chef Huber, an excellent chef with experience from all over the world.  Two of the major things he stressed in class were the concepts of substitution and utilization, two big words that allow for the arts in "culinary arts."

Have you ever tried a recipe, but didn't have all the ingredients or changed some of the ingredients to your personal tastes?  That's substitution!  Now, that concept doesn't always work, especially in baking where specific ingredients have very specific purposes, depending on their specified amounts.  Anyhow, Chef Huber always encouraged us to substitute wherever we saw fit.

In addition to substitution, utilization is another concept in the kitchen that forces you to get creative, often in conjunction with substitution. A restaurant usually ends up with leftover ingredients, or leftovers of a final product; simply throwing it away would fill up your garbage bin with piles and piles of money (costs to buy the food ingredients, costs to make the dish, profit lost because it was not sold, and costs for the garbage man to take it away).  One example of utilization is taking unused breakfast pastries that never made it to the buffet line (e.g. danish, cinnamon rolls, etc.) and turning them into bread pudding the next day.
These pastries have a future beyond breakfast.
The Pastry Demons in Careme's came upon such a predicament when we held a breakfast service, rather than our usual lunch service.  In addition to having a plethora of leftover danishes and sticky buns, the hot line cooks made an excessive amount of bacon.  By the end of the breakfast, a small hotel pan was still filled with a heaping pile of crispy bacon strips.  The kitchen staff, a.k.a. the students, could only eat so much of the leftovers. Rather than throwing it all away, we could hear echoes of Chef Huber's lectures, "Utilization!  Utilization!  Substitution!  Substitution!"

For fans of my Disney food blog, you are well aware of my success of bacon in pastries (If not, check out my February 6th Superbowl Sunday Brunch); bacon at the pastry station is not a strange concept to the Pastry Demons.  Aliesha was all over the task of using this bacon somehow, and I gave her my full support.  The only thing was, how would we use it?  Well, we had another problem to solve that day; we needed a new flavor to serve with our Ice Cream Trio dessert...
Vanilla ice cream churning with a special ingredient.
Yep, you guessed it! We made up our favorite vanilla ice cream recipe and while it was churning, we added some diced up bacon and swirled in a few spoonfuls of maple syrup as an accompaniment.  The other guys in the kitchen thought we were nuts.  A few cringed at the thought, while others were eager to give it a try once it was done, even if it was a crazy idea.  Churning ice cream takes quite sometime, even with an automatic ice cream churner. While going about our other dessert business, the student chefs in the other stations kept finding a reason to come by our little pastry corner asking, "Is it done yet? Is it done yet?"

Finally, after 30 minutes of turning cream into its popular iced variety, the maple bacon ice cream concoction was ready to sample.  The sweet, creamy vanilla ice cream had a subtle, maple flavor and was balanced with the salty, savory flavor of the bacon bits.  The overall result was a creamy, delicious, full breakfast on a spoon!

We felt like the popular kids in school as word got around that there was bacon ice cream in the kitchen.  One student got such a kick out of it that he ran upstairs to the computer lab and updated his Facebook to tell his friends he just had bacon ice cream.
Our new Ice Cream Trio: Vanilla, Chocolate, and Maple Bacon

- Sandwich

19.4.11

The Best Guy We Know

And the awards for "Best Babysitter" and "Best Husband" go to...

Happy Birthday Dad!


Luv,
Shortcake, Sonic, and Sandwich

15.4.11

Peepshi aka Peeps Sushi

Whether you like the chick or the bunny, yellow or blue, pink or purple, and now chocolate-mousse or chocolate-covered, Peeps are pretty adorable. Seriously. How can a tiny, squishy, animal-resembling marshmallow, covered in neon colored sugar crystals, not have a cuteness factor?

Since I was a kid, I’ve preferred my Peeps to be semi-stale. I used to purposely cut a slit in the plastic packaging and let the marshmallow chickies sit out for a day or two before eating them. Or, if I was impatient, I would leave a couple out on the counter for a few hours and hope my dad wouldn’t “accidentally” eat them (he loves Peeps as much as I do). For some reason I've always favored the slightly stale texture to the fresh, gooey one. Weird, I know.
My favorite peeps. Although, the new chocolate mousse one is pretty delicious.
And yet I stumbled on a way to make the marshmallow consumption weirder. The idea to sushi up the peeps appeared on my radar last year, after my social media feeds went ablaze with photo postings of sushi-fied marshmallow chicks. Seriously, who thinks up these things? Not intending to create such a cavity-inducing concoction, I bookmarked the “Peepshi” page merely to share the hilarity of the photographs.

This year, though, I decided to give it a whirl, figuring they could make for a funny party centerpiece. I decapitated a few chicklet heads and split some bunny ears, the marshmallow variety of course; rolled up Rice Krispies Treats; and bound it all with Fruit by the Foot. I felt like I was five years old again, cutting, squishing, and mashing food together. Except instead of a pasta picture frame, I had a mini assembly of crafty Peepshi. Despite my growing curiosity, I have yet to try one; but they are fun to look at.

- Shortcake

14.4.11

Pastry Demons and their Fancy Pants Desserts

(Continued from "Under Pressure" Tuesday, April 11th)...

Speaking of pressure, it didn't help that Melissa and I had been out of the pastry loop for the past 6 weeks, as we had been in two introductory hot foods classes for our degree program.  Thank goodness Aleisha had taken Careme's before, so at least she was there to help us understand how the class worked.  Basically, you have all morning to prepare anything you might need for that afternoon's service.  The prep work was a big guessing game as we had no idea what would get ordered, even if the guests would order dessert at all.

When first reading the dessert menu, the work ahead seemed gargantuan:

- Pear Frangipan Tart with Spiced Plum Ice Cream, Cinnamon Syrup, Honey-Almond Tuiles

- Chocolate Lava Cake with a chocolate liquid center, Dried Cherry Compote, and Mocha Anglaise

- Ginger Crème brûlée topped with Stone Fruit Chutney and Mint Chiffonade

- Ice Cream Trio (3 different ice cream flavors) with Honey-Almond Tuiles

Not only were we tasked to make four desserts, each dessert had multiple components.  Some things were easy: like mint chiffonade, just pick some mint from our backyard herb garden and chop into strips; and cherry compote, chop up this and that, add cherries, mix it all together.  But oh good gravy, it's been at least six months since we made ice cream in class, and a year since we did frangipan and tuiles!  Now was not the time to freak out. We had to dust off the cobwebs from the basic pastry corner of our brains and remember how to make a classic french style ice cream, using real cream and none of that processed, fakey substitute ice cream you find at the supermarket.

As my old chemistry teacher used to say, "Plan the work and work the plan!"  We made up a list of essential things to get done the first day in time for service the next day when the restaurant would be open.  We agreed to set to work making the basics, like short dough for the pie tarts and a batch of frangipan, a classic French, sweet, paste-like filling made of almond, sugar, flour, eggs, and butter.  Meanwhile, Melissa and I reviewed the method of making Creme Anglaise, the mother dessert sauce of the pastry kitchen so to speak.

From Creme Anglaise, you can make custards, like Creme Brulee, and French Vanilla Ice Cream, or any ice cream for that matter (we'll be making Creme Anglaise and turning it into ice cream for a future "Whip of Dole").  From multiple batches of anglaise, we were able to get the Mocha Anglaise sauce made, Crème brûlée prepped, as well as 4 flavors of ice cream (Spiced Plum, Mocha, Chocolate, and good ol' Vanilla).

Melissa, Aleisha, and I really surprised ourselves those first few days of Careme's.  After the freaking out, and asking ourselves "Uh, what the heck are we doing?" on the first day, we successfully made each of the desserts on the menu.  The skills we had learned in our classes, leading up to making desserts for a real working restaurant, came back like magic.  Chef would occasionally check up on us and ask, "How are my little pastry demons doing?"  We would reply with a spoonful of deliciousness.

He found our chocolate ice cream and spiced plum ice cream to be, and I quote, "Phenomenal."  Though all the credit can't go to us. Chef gave us such a great guiding hand and helped us realize his vision for these desserts, while also letting us get a little creative with our own ideas.  He was really pleased that we did such a great job those first few days, and that the restaurant could serve some fancy pants desserts made by actual student pastry chefs.

I still can't get over the fact that we made this happen.  I don't like to toot my own horn, but we really rocked it out at the pastry station!  As they say, a picture's worth a thousand words:

Pear Frangipan Tart with a scoop of Spiced Plum Ice Cream, a drizzle of cinnamon syrup, Honey-Almond Tuile corkscrew, and a sprig of mint for color

Chocolate Lava Cake with Dried Cherry Compote on a pool of Mocha Anglaise.  We got confused and put the chiffonade mint on this one, but it was a happy accident as it came out nice!

 Chef's special recipe: Ginger Crème brûlée with Stone Fruit Chutney and Mint Chiffonade.
Ice Cream Trio with Honey Almond Tuile. This was actually probably the 4th day, as only one person ordered the trio the 1st day of service and I forgot to take a picture.  Seen here is our Watermelon Sorbet, Vanilla and Chocolate Ice Cream.
Stay tuned for future adventures from Careme's, with Chef's Pastry demons; haha.

- Sandwich

12.4.11

Under Pressure (cue Queen)

Part of the culinary program at my school is to work in the school's on campus restaurant Careme's, named after Marie Antoine Careme, one of the very first "celebrity chefs" back in the 1800s.  The end of the baking and pastry major's education for those in the degree program consists of working in the front of the house (server/hosting) and the back of the house (kitchen).  I just started my three week course in back of the house last Friday, and I have to admit I was a bit terrified.  You're basically thrown right into the midst of everything, and you only have your noggin to rely on for getting everything done.

 Marie Antoine Careme himself.  Image from http://www.famoushotels.org/article/984

The head chef, our instructor, wrote up a menu. On our first day, he told us his bosses said it was too difficult and it should be trimmed a bit, so we would not get overwhelmed; but Chef stood his ground and kept the menu the same.  He made a good point, that he was brought on to challenge the students and not let us slide by.  I was glad he believed in us, but a bit more anxious that we had to make this menu happen...the pressure was on!

If you've seen Ratatouille, or any restaurant kitchen themed movie/show, you know there are stations in the kitchen: the cold foods, soups and sauces, vegetables, fish, roast, saute, breads, pastries, etc.  I have to admit, it was pretty cool being like the chefs on Ratatouille. I was eternally grateful that Chef assigned myself and my friend, Melissa, in the pastry station, as we were the only two baking and pastry majors in the class.  We were also joined by our friend Aleisha, who was in our very first class then left us for hot foods classes.  It was like a reunion! 

Speaking of such, the school restaurant is typically run by mainly the culinary hot foods majors since (1) Careme's is only required for the degree majors and (2) the baking and pastry majors are few in number.  Typically, the students are rotated throughout the stations to get a try of everything, and nearly every hot foods major hates the pastry station.  So when Chef found out that he was getting two baking and pastry majors in his kitchen, he said we could stay there the whole block (yay!), and drew up a lovely little menu of some fancy pants desserts...no pressure. :-/

I met Chef at the beginning of this school year back in October 2010, and throughout the year he had always been asking me, "When do you have Careme's?" or "I have you in Careme's for Block 4!" So he was pretty excited that I was coming.  Again...No pressure, right??

So as you can see, I was terrified of screwing up on my first day...(to be continued, come back on Thursday April 14th for the exciting conclusion!)

- Sandwich

11.4.11

Winnie the Pooh's Honey Lemonade

I love Lemonade.  It's probably my favorite drink in the entire world, despite its simplicity.  Water, lemons, sugar, all in different proportions according to your taste.  For years, I'd look up different recipes of those proportions, always trying to find my perfect balance between sweet and tart, with both complementing each other.  I didn't like recipes where the sweet sugar taste overpowered the tartness of the lemon, and I didn't like when it seemed to just be lemon and water mixed together.  There needed to be a perfect balance, a harmony of both extremes.

Then, one fateful morning, it happened.  I found the perfect balance, the right amounts of every ingredient that allowed me to have the most satisfying glass of lemonade ever in my life.  And all it took was a little honey.

My cousin grows lemons in her backyard, and usually in the morning, she'll squeeze a few to make lemonade.  I was telling her about how I kept experimenting with different proportions, but could never find a lemonade recipe that truly appealed to me.  She told me to try substituting honey instead of sugar.  At the time, I had never heard of such a thing.  And it was such a revelation that I was over the moon when I tasted it.  I mean.  Oh.  My.  Goodness.  It was that good.  Water, Lemon, and Honey.  So simple, but so earth-shatteringly mind-blowingly amazing.  How has that recipe eluded me for years?

It's a quick recipe.  Simply combine all three ingredients, stir or shake (I prefer stirring, sorry Mr. Bond!), and refrigerate.  The proportions I give at the end are my personal preferences, and sometimes I'll add a pinch of sugar as well.  It's a very versatile recipe, so I suggest experimenting to what works best for you.  But, how do you make it even better?
Auntie Ann's Pretzels offers Lemonade Mixers, which is a fancy way of saying "We'll add some fruit-flavored syrup to your lemonade and charge extra for it!"  Granted, the flavors are worth the extra price, and I love getting a cherry lemonade if I ever stop by an Auntie Ann's.  So I thought, this afternoon, how could I replicate a cherry lemonade without having to go to Auntie Ann's?  

And it dawned on me.  Rita's Water Ice.  Their cherry water ice is to die for, and I figured if it tastes great on its own, it surely would taste even greater when mixed with lemonade.  But I didn't want to just stir in some water ice with the lemonade.  That would be too boring.  Instead, I decided I'd re-freeze the water ice.

I bought a quart of the Cherry water ice, partly so that I'd have enough for an ice tray and partly so that I could have leftover to eat on days when I didn't want to go to Rita's.  Since the water ice is already in that slushy stage, it wasn't too hard to scoop it out and put them into the ice tray.  Unfortunately, it meant that they'd look kinda lumpy on top, but I didn't mind.  It's not an aesthetic quality I was aiming for.
I didn't do a whole tray, in case this experiment would be a failure, so I only scooped eight cubes.  As soon as I put them in the freezer, I began making my lemonade.  Four lemons got me one cup of lemon juice, but after straining several times, that one cup turned into 3/4, as 1/4 was pulp.  Normally, I'd leave the pulp in, but since I wanted to be able to include the cherry water ice cubes, it seemed best for the pulp to go.

I then poured the lemon juice into my water pitcher, and then added the half-cup of honey.  Some recipes call for all this to be done with hot water in order for the honey to fully dissolve.  While I do like that effect, I also like still being able to distinguish between honey and lemon when sipping my drink.  I stirred all three together, and the honey helped give the lemonade a very rich color than the normal water-lemon-sugar version.  

I then checked on my cherry water ice cubes.  They still weren't fully frozen, but they were solid enough, and so I attempted to scoop one out.  That ended badly, as it completely fell apart.  I was hoping that they would be solid enough that when it dropped into the lemonade, there would be a more colorful juxtaposition between the lemon and the ice.  Alas, as of this writing, the cubes are not yet solid.

Still, I wanted to see how a cherry lemonade would taste with Rita's, so I simply took a small spoonful and stirred it in a smaller glass of lemonade.  Incidentally, this was what I considered too boring before, and yet it turned out to be the only option I could do!
Not only did it taste amazing, but the vivid redness of the cherry water ice reminded me of Pooh's red shirt.  In addition, the use of honey instead of sugar also helped tie very much to the silly ole bear.  Thus, Winnie the Pooh's Honey Lemonade was born.


Winnie the Pooh's Honey Lemonade
5 1/2 cups water
3/4 cup lemon juice
1/2 cup honey
A spoonful of Cherry Water Ice (I used Rita's)

Directions:
Stir-n-shake-n-refrigerate!  Enjoy!

- Sonic

8.4.11

Don't Lay a Finger on My S'mores

Butterfinger S’mores and Chocolate Peanut Butter

You read that right. Butterfinger S’mores. A good portion of you are probably tempted to skip ahead to feast your eyes on the recipe and the plethora of photos of the indulgent treat. Heck, I’m getting cravings right now just writing about it.

Unintentionally continuing with last week’s theme about comfort foods and childhood favorites, s’mores automatically elicit dozens of lifetime memories. Ironically, only two or three involve the outdoor activities of camping or bonfires. The earliest memories consist of my brothers and me watching the microwave in anticipation, hoping for the heated marshmallow to follow in Mr. Stay Puft’s footsteps in Ghostbusters and blow up. Sadly, despite nearly always bloating to twice its size, the marshmallows never exploded.
Despite the lack of explosions, s’mores was probably the one dessert my parents were not fond of doling out to us. 1) It was the stickiest, messiest thing ever. 2) It was the sweetest thing ever. 3) It brought out the most overactive hyper-ness in all three of us. And all three of those reasons are probably why the delectable S’mores got its name. It leaves you wanting more, no matter how sticky or messy. Seriously, could anything be more fun and sinfully delicious than graham crackers, gooey chocolate and roasted marshmallows?
Well, of course they could. Enter the creamy goodness of peanut butter, my personal addiction. Another classic combination, peanut butter and chocolate have been joined at the hip for decades. The overwhelming popularity of the combination is what propelled the peanut butter cup to become a king in the candy aisle. So why not add the nutty butter to the s’mores family and make it a foursome?
Granted, I knew I wasn’t just going to replace a Hershey bar with a Butterfinger bar in this concoction. That would be too simple. And it would be way too difficult to enjoy, since Butterfingers are usually extra crunchy and almost always annoyingly stick to those back molars. I thought about using a Reese’s peanut butter cup, but its ratio of chocolate to peanut butter didn’t satisfy me. Plus, I wanted a taste of real peanut butter thrown in, none of that processed stuff.
I cheerfully experimented and came up with my own version of chocolate peanut butter. Some Butterfinger bars were crushed, marshmallows were roasted, and everything was sandwiched in between two glorious graham crackers. And boy was I reeling from the sugar high afterwards.

Butterfinger S’mores
Serves 2
  • 4 Tb Chocolate Peanut Butter, recipe follows
  • 1 fun sized Butterfinger or 1/3 Butterfinger bar, crushed
  • 4 Graham cracker squares
  • 4 marshmallows or 2 jumbo sized marshmallows

  1. Make the chocolate peanut butter. You can also purchase pre-made chocolate peanut butter in stores such as Trader Joe’s or Whole Foods. But I prefer the homemade recipe because of its similar taste to Butterfinger filling.
  2. Crush Butterfinger bar into small, crumbled pieces; set aside.
  3. Spread a satisfying helping of chocolate peanut butter on two graham cracker squares. Sprinkle and gently press down a layer of the crushed Butterfinger on top of one chocolate-peanut-buttered graham cracker. For extra sweetness, if you don’t mind the mess, go ahead and sprinkle a layer of crushed Butterfinger on your second graham cracker as well.
  4. Roast the marshmallows either over a flame or use your oven’s broiler. I broiled them at 400F. Watch them carefully; it only takes a minute or two for the tops of the marshmallows to reach the beautiful golden brown color.
  5. Layer two roasted marshmallows on top of the crushed Butterfinger graham cracker. Then press the second chocolate-peanut-buttered graham cracker on top of the marshmallow, chocolate-peanut-butter side down.
  6. Enjoy the sticky, messy, peanut buttery sweetness.
Chocolate Peanut Butter
Makes 4 Tablespoons
  • 1 heaping Tb semi sweet chocolate chips
  • 2 heaping Tb creamy peanut butter
  • ½ - 1 Tb softened butter, as needed to soften
  • 2 tsp Confectioner’s (powdered) sugar

  1. Heat and melt the semi sweet chocolate chips in the microwave. Be careful not to scorch them. The best way to prevent scorching is to heat the chips at 20 second intervals and stir them after each interval. In my microwave, it took about 45 seconds to heat it to the desired soft, melty consistency.
  2. Mix in the peanut butter, sugar, and butter into the chocolate. Start w/ ½ Tb softened butter and add a bit more to get the desired chocolate peanut butter to a creamy consistency.
Chocolate Peanut Butter (full recipe)
For people who want a larger quantity to save for sandwiches and other treats =)
Makes about 2 cups
  • ¾ cup semi sweet chocolate chips, melted
  • 1 ½ cups creamy peanut butter
  • ¼ cup confectioner's sugar
  • 4 – 5 Tb butter, softened

Follow the same directions as above

- Shortcake

4.4.11

I'm Gonna Write About Meatballs


Once upon a time, there was a little boy named Sonic.  He was only two years old, and there was a whole world known as the First Floor that was his to explore.  Afternoons were the best time to explore this world, and rather than sit down and eat lunch, little Sonic would run around the First Floor, play with occasional toys, run around again.  Afternoon was not a time to sit down.

However, despite Sonic's intent to run around the First Floor, his mother knew he had to have his lunch.  But she could never get him to stay still.  Instead, she would follow him around, with a meatball at the end of a fork.  She'd cry out in Tagalog, "Subo! Subo!" which in English translated into "Mouthful! Mouthful!", but in Mom-speak was the command, "Eat!  Eat!"  

And so, Sonic would stop running, bite the meatball off the fork, then continue running again.  It took a half-hour for him to have a full lunch, but it was always satisfying.  

The End
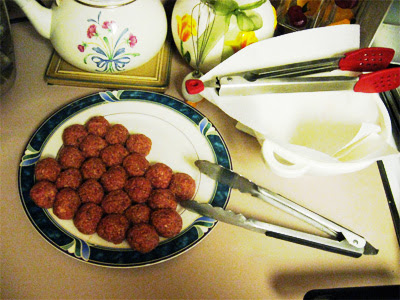
Actually, this is only the beginning.  You see, last Saturday, I made meatballs from an old family recipe.  Not our family recipe (do we have one?), but a very good family recipe.  It contained all the traditional meatball ingredients , along with a few secret ingredients not pictured, which I'm not at liberty to divulge. ;-)  
Traditional Meatball Ingredients:
1 pound ground beef
Eggs & Bread Crumbs (for every egg, 1 ounce of bread crumbs)
Grated Cheese
Spices (pinches and dashes that suit your taste)
Hot dog buns for sandwiches

There are so many family recipes out there, it's hard to pick just one to talk about.  "Throwdown with Bobby Flay" had a pretty good one by Grandma Maronis, and eHow Food's Spicy Beef & Spinach Meatballs sound delicious as well.  And hopefully one day I can make Lamb Meatballs without having Sandwich cry over them.

The best thing about meatballs, in my opinion, is the spices that add flavor.  I'm very generous when it comes to adding the spices; I like when the flavors are overpowering, even if they shouldn't be.  I'm partial to paprika and likely would use it in every dish if I could (paprika chocolate?  Hmm...).  In addition, I've often added crushed garlic versus garlic powder, which not only gives a stronger scent to the meatballs, but also makes the meatball taste much better.

Strangely, even though people traditionally use tomato sauce in their meatball sandwiches, I always like just the meatballs with the bread.  It allows me to fully taste the meatball, and it's a lot cleaner too.  And when you add some Veggie Straws to your plate, it can almost pass for French Fries!

The title of this WhipsOfDole stemmed from a text message I sent to Shortcake a few days ago.  She wanted to know if I had picked an idea to write about for the blog, and simply texted back to her, "I'm gonna write about meatballs."  Taken out of context, the line seems really odd, but still funny.  And rather than just say "Meatballs Recipe," this seemed like a more fun way to title this article.

-Sonic

1.4.11

French Grilled Cheese Toast

It’s the first day of one of the tastiest months of the year, and I couldn’t be more ecstatic. Even though I’ve decided to forego the pranking this year, which is borderline shocking if you know my past history, this first day of April still kicked *bum* for one reason. Cheese, gooey, salty, sharp, nutty, buttery, cheese. Get your cheese hats on because it’s National Grilled Cheese Month, peeps!
As it just so happens, grilled cheese is #2 on my “Favorite Comfort Foods Ever” list, with the almighty Elvis sandwich barely edging out the competition at #1. One of my favorite attributes of grilled cheese is its versatility, offering myriad meal possibilities. In its simplest form, the sandwich is a wondrous compliment to a wide array of soups and salads, or it is the shining star of a child’s after school meal. In its most complicated form, vegetables, meats, herbs, spices, and even French fries can all lend an enthusiastic hand in forming some of the tastiest, cheesy sandwiches imaginable.

Because it’s a Lenten Friday, I left the fanfare of meat out in today’s sandwich. But, I still wanted to give the classic a lively twist. That’s when it occurred to me, brunch. I love weekend brunch. I love the array of meal possibilities that combines the sweet and the savory, the familiar and the unique, and syrup with anything. Most of all, I love that it grants me the opportunity to order French toast at 12:30 in the afternoon when everyone else is ordering a steak. So, I’m kicking off this month by further brunch-ifying the simple grilled cheese sandwich. I say further because on its own, grilled cheese can be brunch.
Fresh baked French baguette from La Brea bakery
What resulted was a simple, miniature, open faced sandwich which could be served as a snack, appetizer, or even a mini meal. I went for classic and basic, refrigerator staples and it’s fairly quick to whip up. Now I know I’m not the first to think up this concept, but it’s definitely the first time I’m trying it out.
I love the cinnamon scent that rises during the French toasting process.
The fresh, French baguette was a light and airy alternative to dense, Texas sliced white bread. French toasting the baguette melded extra flavors into an otherwise commonplace sandwich. The tart, Granny apple lent crunchy texture and was a compliment to the cinnamon and nutmeg. Pure, whole American cheese provided the salty gooeyness I had been craving the past couple days.
Just starting to melt
After a few bites, I realized that French toasting the bread provided a definite oomph to the meal, lifting the sandwich to a higher level. In the future I may add more depth by using different cheeses, like Fontina or Gruyere, or even different bread, like Challah. And maybe next time I’ll remember to drizzle a little syrup or honey on top before I devour the entire thing.
Shadows from the sunset.
Gear up your tummies kids, because your grilled cheese is going to get French-ed today.

French Grilled Cheese Toast
Serves 4
  • 1 regular or 2 small French baguettes
  • 2 slices American cheese
  • 1 Granny smith apple
  • 1 large egg
  • ¼ cup buttermilk, or regular milk
  • 1 tsp Cinnamon
  • ½ tsp Nutmeg
  • ½ - 1 Tb butter, for frying
  • Syrup or honey, optional
  1. Slice the apple into at least 16 thin slices. Set aside.
  2. Beat the egg and milk together. Add the cinnamon and nutmeg. I used more cinnamon and nutmeg than what I wrote in the recipe because I love a strong cinna-meg taste.  
  3. Slice the baguette on a bias into 4 thick slices, at least 1 inch. Soak the slices in the egg mixture on both sides.
  4. Heat and butter frying pan. Fry the soaked baguette slices on both sides.
  5. Add ½ slice of cheese on top of each baguette slice. Cover and let the steam melt the cheese slightly. This step is easier and faster if the cheese is set out early and reaches near room temperature.
  6. Top each slice of cheesed French toast with 4 thin slices of apple.
  7. Plate and enjoy! If you have a sweet tooth, use syrup or honey as a dip.
- Shortcake